AFD Postcode Evolution® for Adobe Commerce (Magento) is a module that allows you to harness the full power of AFD Software’s Postcode Evolution® web service within your e-commerce store.
Currently the module adds the following functionality:
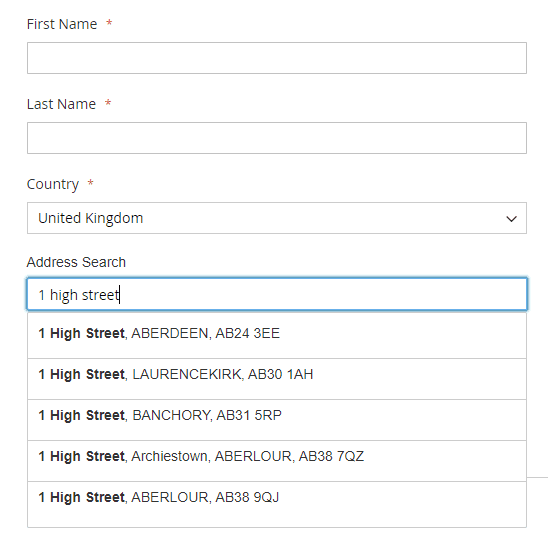
When inputting an address, the user can either start typing an address until it appears in the results box or they can type in a postcode. Once a result is selected, the fields in the form will be populated with the PAF data of the selected record.

AFD Postcode Evolution® for Adobe Commerce (Magento) is currently supported to run on the following Magento versions:
For the below listed versions download the AFD Magento Extension (v1.6.x) here.
For the below listed versions and any subsequent iterations download the AFD Magento Extension (v1.7.1) here.
					php bin/magento module:enable --clear-static-content Afd_Pce
php bin/magento setup:upgrade

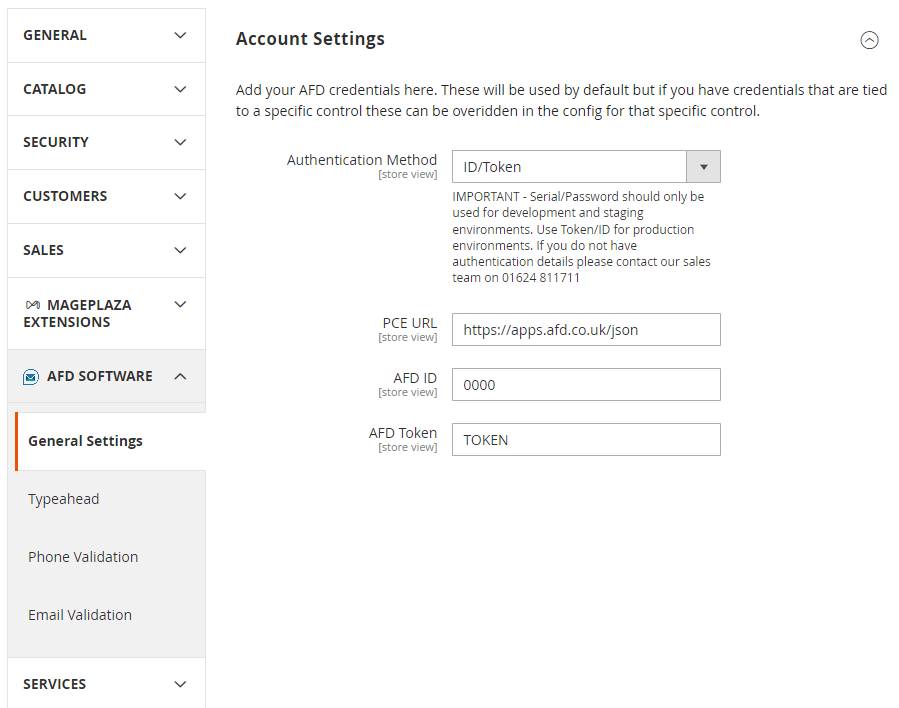
Either Serial/Password or ID/Token.
IMPORTANT – Serial and password should only be used for testing and evaluation purposes. In a production environment an ID and Token are required, these will be provided by AFD support.
Unless you are using a custom AFD PCE server, this can be left as the default URL.
If you are using ID/Token, use https://apps.afd.co.uk/json.
Your AFD software serial number.
Your AFD Password.
Your AFD ID.
Your AFD Token.

Typeahead address searching makes inputting addresses a much more pleasant experience for the customer and ensures that the data that is collected is accurate – essential for eCommerce.
Typeahead is available on the following forms:
Our Magento typeahead plugin comes equipped with these great features:
There are a number of configuration options for the magento extension that allow for customisation of the look, feel, and functionality of the forms.
default – “Start typing your address”
example – “Start typing your address, postcode, or what3words”
This is the text that appears in the address search box before a user has interacted with it.
default – Yes
Magento forms typically have the country field at the end of the form. As the appearance of the search box is dependent on which country is selected it is usually desirable to make the country field appear before the rest of the address. This setting moves the country field to the top of the address form.
default – Yes
If set to Yes this will hide the address search box once the user has selected their address from the search results.
default – Yes
If Hide Typeahead Field After Selection is set to Yes then setting this to Yes will show a Search Again button that will reset the address form and once again show the search box.
default – “Search again”
The markup for the search again button. By default it is plain text but it can accept HTML.
CSS rules to be applied to the search again button.
default – Yes
Setting to yes empties the contents of the search box after an address has been selected.
default – Yes
To create a cleaner and easier to use form this setting hides the address fields until after a result has been selected from the results list.
default – Yes
If Hide Address Fields Before Search has been set to Yes, enabling this will add a manual input button below the search box that when clicked will hide the search box and display the address form. A button will also be added to the address form that when clicked will hide the fields again and show the search box.
default – “Manually enter address”
The markup for the manual input button. By default it is plain text but it can accept HTML.
default – “Search for address”
The markup for the address search button. By default it is plain text but it can accept HTML.
CSS rules for both of the manual input buttons.
default – Yes
If enabled, this setting will hide any empty fields from the address form when the result has been selected from the search results list.
default – Yes
When this setting is enabled, the results in the search results list will be altered so that any part of the result that matches the search query will be highlighted.
default – No
When set to Yes, this setting changes the format of the results in the search results list so that the Postcode is at the beginning of the result instead of the end.
default – UK, Isle of Man, Jersey and Guernsey
Region is not a field that is used in the addresses of all countries. The countries selected in this list will not display the region field in the address form.
default – No
When enabled, if one of the three crown dependencies (Isle of Man, Jersey and Guernsey) are selected, when a result is selected the country will be changed to “United Kingdom”. In PAF the name of the crown dependency occupies the “Town” field.
default – UK, Isle of Man, Jersey and Guernsey
Countries for which the search functionality should be enabled.
default – 5
default – No
If zero or fewer than maximum number of results are returned, enabling this setting will show a suggestion that the user can manually enter their address by clicking on the button.
default – “Can’t see your address? Enter it manually”
The message that is displayed if Few Results Message is enabled.

It is also possible to retrieve a user’s address using the browser geolocation api. Activating this feature will add a button next to the typeahead field that when clicked will ask the user for permission to access their location, after permission has been granted our integration will collect the location from the device and perform a reverse geocoding lookup that will return a list of the closest addresses to the user’s current location.
The button can be configured to use either plain text or HTML, which is useful for stores that wish to show SVG icons instead of text.
This feature works best on mobile devices, with less accuracy on desktop devices. This being the case, it is possible to configure the button to only display on mobile devices.
This feature is only available for UK and it requires additional services to be enabled on your account. Contact our sales team if you require this service.
default – No
Whether or not reverse geocoding should be added to the typeahead field.
default – Yes
The quality of reverse geocoding lookup results are significantly higher on mobile devices that have GPS functionality. When this option is enabled the button will only be displayed on mobile devices.
default – Find Address Automatically
This can accept HTML which is useful if an SVG icon as desired. An example of a target icon is:
<svg width="18" height="18" viewBox="0 0 1792 1792" xmlns="http://www.w3.org/2000/svg"><path d="M1325 1024h-109q-26 0-45-19t-19-45v-128q0-26 19-45t45-19h109q-32-108-112.5-188.5t-188.5-112.5v109q0 26-19 45t-45 19h-128q-26 0-45-19t-19-45v-109q-108 32-188.5 112.5t-112.5 188.5h109q26 0 45 19t19 45v128q0 26-19 45t-45 19h-109q32 108 112.5 188.5t188.5 112.5v-109q0-26 19-45t45-19h128q26 0 45 19t19 45v109q108-32 188.5-112.5t112.5-188.5zm339-192v128q0 26-19 45t-45 19h-143q-37 161-154.5 278.5t-278.5 154.5v143q0 26-19 45t-45 19h-128q-26 0-45-19t-19-45v-143q-161-37-278.5-154.5t-154.5-278.5h-143q-26 0-45-19t-19-45v-128q0-26 19-45t45-19h143q37-161 154.5-278.5t278.5-154.5v-143q0-26 19-45t45-19h128q26 0 45 19t19 45v143q161 37 278.5 154.5t154.5 278.5h143q26 0 45 19t19 45z"></path></svg>
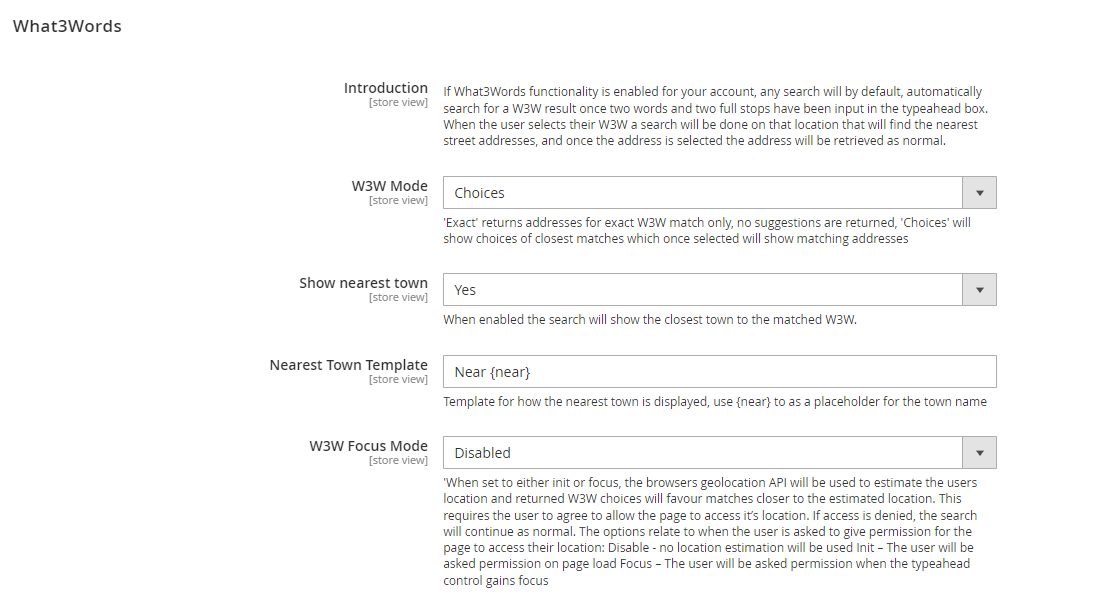
AFD’s address lookup solution can now find addresses by entering a what3words location. When entered, AFD’s solution returns the nearest property-level address.

default – Choices
‘Choices’ – show choices of closest matches which once selected will show matching addresses
‘Exact’ – Returns addresses for exact W3W match only, no suggestions are returned
default – Yes
When set to Yes shows nearest town.
default – Near {near}
A String prior to the town display, only enabled when Show Nearest town is set to true.
When set to either init or focus, the browsers geolocation API will be used to estimate the users location and returned W3W choices will favour matches closer to the estimated location.
default – Disabled
‘Disabled’ – this functionality is disabled
‘Init’ – The user will be asked permission on page load
‘Focus’ – The user will be asked permission when the typeahead control gains focus

Email address validation can be activated on the following forms:
Validation occurs when the email control loses focus and has two stages. First, the syntax of the email address is validated, if the syntax is valid a request will be sent to AFD’s servers to do a full validation.
While the email address is in an invalid state, the submit button of the relevant form will be disabled. Once the email address has been validated, the submit button will be enabled.
Our module comes equipped with the following customisation options:
Below are the various options available for configuring the functionality.
default – No
Global control for email validation.
default – Yes
If you are using multiple features of this module and have different authentication details for email validation set this to No.
Either serial/password or id/token.
IMPORTANT – Serial and password should only be used for testing and evaluation purposes. In a production environment an ID and Token are required, these will be provided by AFD support.
Unless you are using a custom AFD PCE server, this can be left as the default URL.
Your AFD software serial number.
Your AFD Password.
Your AFD ID.
Your AFD Token.
Which forms email validation should be enabled on. The following forms can individually have email validation enabled or disabled:
default – “Please enter a valid email address”
The error message that users will see when they enter an invalid email address.

Phone number validation can be activated on the following forms:
Validation occurs when the phone number control loses focus and has two stages. First, the format of the phone number is validated, if the format is valid for the given country a request will be sent to AFD’s servers to do a full validation.
A default country dialling code can be set in the config options. When a user is typing a phone number into the phone control they will not need to add a dialling code for this country, however, if a user prefixes their number with either + or 00 followed by a country code then the country code that is given will be used for validation.
In addition to validation, the module will also mask the phone number so that it appears in the expected format for the given country. For example, 01624811711 will automatically be reformatted to 01624 811 711.
Our module comes equipped with the following customisation options:
Below are the various options available for configuring the functionality.
default – Yes
If you are using multiple features of this module and have different authentication details for phone validation set this to No.
Either serial/password or id/token.
IMPORTANT – Serial and password should only be used for testing and evaluation purposes. In a production environment an ID and Token are required, these will be provided by AFD support.
Unless you are using a custom AFD PCE server, this can be left as the default URL.
Your AFD Software serial number.
Your AFD Password.
Your AFD ID.
Your AFD Token.
Which forms phone validation should be enabled on. The following forms can individually have phone validation enabled or disabled:
default – “+44”
The default country code for the control. For whatever code is entered here, users will not be required to specify a country code to have their phone number validated.
Must be prefixed with +.
default – “Please enter a valid phone number”
The error message that users will see when they enter an invalid phone number.
