Entering Your Credentials

Install the SalesForce Screen Flow package from here.

After installation, first make sure that you have entered your credentials for the AFD API. You can do this by selecting ‘Setup’ from the top right-hand corner and then going to ‘Custom Code’ > ‘Custom Settings’.

Next to Address Config, click on ‘Manage’ then under ‘Default Organization Level Value’, click on ‘Create New View’.

Choose an appropriate name, maximum response is how many results you want to appear when searching for an address. Enter your serial number and password, and in the “Serial Endpoint” field enter https://api.afd.co.uk/

If you want to use ID and Token, contact support at support@afd.co.uk and provide the domains for your organisation. They can be found in Setup > User Interface > Sites and Domains > Domains

Salesforce domains

If you have been supplied with ID and Token, enter them instead of serial and password. In the “Token Endpoint” field, enter https://apps.afd.co.uk/json, and ensure “Use Token” is ticked.

salesforce serial password
salesforce id-token

It should appear as follows once set:

AFD Countries Object

After you have setup your credentials, you need to ensure that you have updated/imported the country list into the AFD Countries Object.

To do this, go via the App Launcher and select ‘View All’ – scroll to ‘All Items’ and choose ‘AFD Countries’. Select the import option. An example CSV file can be downloaded here.

Continue to the next page to import. Once imported, go back to the Countries page, and select the setup option – ‘Select Fields to display’ to display the imported country fields.

Flow Component

Within the flow build, when editing your screen, add the Address Finder (AFD Validation) component from the components list from within the custom section.

The address Finder component should appear as follows:

Set the properties of the component to define the address fields to be displayed. The address component properties will generate the address fields. If you have existing address fields within your screen, you will need to replace them with the component field settings for interaction with the lookup.

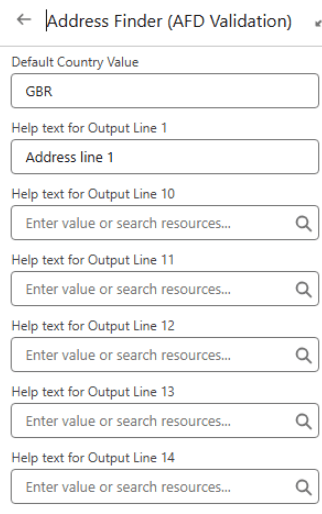
Set the Default Country to the 3-character ISO code (e.g., GBR). This will default the country component to UK addresses.

The list data returned by the initial lookup makes use of the list value from the field presets e.g. Standard. The AFD Field Type should be set to one of these. Should your required output fields be available in the same preset (e.g. Standard fields), the AFD Field Type setting will determine the fields returned.

Additionally, there is a ‘custom fields’ option. This allows you to specify the individual fields you want to be mapped into your output fields, should your required fields span multiple field presets (e.g. fields from the standard and raw presets). The example below shows how to combine fields from the raw and standard data presets.

Note. You will need to enter the fieldnames separated by the @ symbol as shown and make sure they are correctly mapped in the “AFD Field to map for Output” fields too (further details below).

In addition, set the AFD Password and AFD Serial field setting.

There are 3 sets of field properties. The AFD Field to map, The Label for the Output, and the Output Value.

AFD Field to Map – set this to the field value returned from the lookup. For example, setting to Address1:

Set the label that will be displayed for this field at the corresponding ‘Label for Output’ . For example, ‘Address Line 1’:

The Output value fields are what you will use when assigning the field values to your object via the create records element.

When viewing your screen flow page, it should appear as follows, when set with the examples above:

You can specify the Helptext for a field which will be displayed as a tooltip.
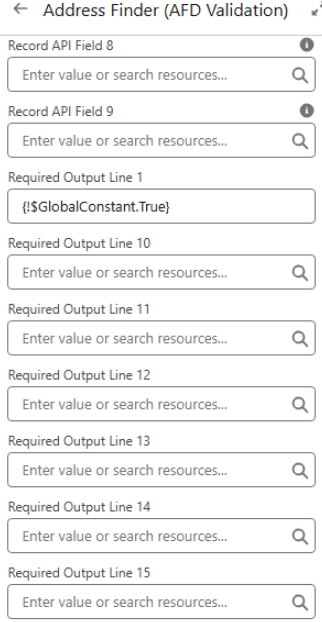
To mark fields as Mandatory add {!$GlobalConstant.True} to the chosen “Required Output line” field.
Email Validation

Setup

To ensure this works correctly, it is required that you have already updated/imported the country list into the AFD Countries Object. Within the flow build, the properties of the component to define the phone fields will be displayed like the below:

  1. If this is a required field, input True or False in the ‘Is required?’ field.
  2. The Label field will determine the displayed label for the input.
  3. To provide a help text icon including information, enter a value in the ‘Help text’ field.
  4. Allow users to override the input value provided from validation by changing the ‘Allow override’ from False to True.
  5. If ‘Display Validate Button’ is set to true, a button will appear, and validation will only occur once the user has clicked on it. If set to false, then validation will trigger automatically with a blur event.
  6. Providing a value in the ‘Custom Error Message for User’ field will display an error message to the user if an email address is invalid.
  7. The ‘Email Value’ field assigns the output variable to be used in Flow.
  8. The ‘Error Code’ field will return an error code value that you can assign to be used in Flow.
  9. The ‘Error Message’ field will return an error message that you can assign to be used in Flow.
  10. ‘AFD Serial’ is a required field – please supply the serial number provided by AFD.
  11. ‘AFD Password’ is a required field – please supply the password provided by AFD.

Phone Validation

Setup

To ensure this works correctly, it is required that you have already updated/imported the country list into the AFD Countries Object. Within the flow build, the properties of the component to define the phone fields will be displayed like the below:

  1. If this is a required field, input True or False in the ‘Is required?’ field.
  2. The Label field will determine the displayed label for the input.
  3. To provide a help text icon including information, enter a value in the ‘Help text’ field.
  4. Allow users to override the input value provided from validation by changing the ‘Allow override’ from False to True.
  5. If ‘Display Validate Button’ is set to true, a button will appear, and validation will only occur once the user has clicked on it. If set to false, then validation will trigger automatically with a blur event.
  6. Providing a value in the ‘Custom Error Message for User’ field will display an error message to the user if an email address is invalid.
  7. The ‘Phone Value’ field assigns the output variable to be used in Flow.
  8. The ‘Error Code’ field will return an error code value that you can assign to be used in Flow.
  9. The ‘Error Message’ field will return an error message that you can assign to be used in Flow.
  10. Set the ‘Default Country Code’ using the codes provided in the Country List stated above.
  11. ‘AFD Serial’ is a required field – please supply the serial number provided by AFD.
  12. ‘AFD Password’ is a required field – please supply the password provided by AFD.

All API Calls will be stored in an object called AFD API Logs:

Refiner

Installation

Install the SalesForce Screen Flow package from here.

For the full AFD Screen Flow documentation please see here.

Configuring AFD Refiner Custom Settings

  1. Go to Setup
  2. In the Quick Find box, search for Custom Settings and click on it
  3. Locate AFD Refiner in the list and click Manage
  4. Click New at the Default Organisation Level
      • Enter the AFD Refiner Serial number and Password provided by AFD.
      • The API endpoint (https://yourdomain/v1)
      • Batch size – recommended sending in batches of 50.
      • Email – the email address you want to receive notifications of job completion.
      • API Log – is used for debugging purposes ad doesn’t need to be enabled by default.
  5. Click Save.

Accessing AFD Bulk Address Validation App

  1. Open the App Launcher by clicking on the grid icon in the top-left corner.
  2. Search for and select AFD Bulk Address Validation from the available apps.

Understanding the AFD Refiner Package Features

Once inside the AFD Bulk Address Validation app, you will have access to three key sections:

  1. Template: This is where users set up how they want to clean and validate address data and how often it should run.
  2. View Results: This section allows users to check and verify the results of the address cleaning process.
  3. Error Logs: Users can monitor and review any errors encountered during the address cleaning process.

Setting Up a New Template

Adding a New Template

  1. Click Create New Template.
  2. A new popup window will appear, prompting you to enter template details:
    • Template Name: Enter a name for the template.
    • Object: Select the Salesforce object where you want to validate the addresses (e.g., Accounts, Contacts).
    • Type: Select the AFD Address Type (e.g., Standard, International, RAW). This will determine the type of address fields returned by the API.
    • Status Field: Specify a custom field to store the status from the API response. You can use an existing field or create a new one.
    • Last Updated Field: Choose or create a custom field to store the last updated date from the API.
    • Result Field: Choose or create a custom field to store the result details from the API.
    • Run with Schedule: Check this box if you want the template to run automatically based on a schedule.
    • Auto Update: Check this box to allow the API to update the fields automatically if the address is not valid.
    • Click Next to proceed.

Click create New Template button from screen and it will open up new popup to setup template.

Configuring Conditions for Data Selection

  1. On the next screen, you can set up conditions for selecting data to run the address validation.
    • To run validation on all records, leave the selection as None.
    • To run validation on specific records, choose All conditions are met or Any conditions are met, and set your filter criteria (e.g., Last Updated >= certain date).

As Refiner is a UK product, we suggest adding a rule to only run against your UK records – here is an example using Billing Country:

Field Mappings

  1. On the next screen, map the fields from Salesforce to AFD fields. This mapping will allow the API to validate and update the necessary fields.
  2. Click the Add button to continue adding field mappings as needed.
  3. Note that multiple AFD fields can be mapped back to a single salesforce field. these values will be comma separated.

Query Syntax

  1. Review the query generated based on your inputs.
  2. Click the Check Syntax button to verify if the query is correct.

Confirmation

  1. On the final screen, review the confirmation and warning texts.
  2. Click Save to store the template. If Run with Schedule is enabled, the template will run based on the criteria you entered.

Editing an Existing Template

  1. To edit a template, locate the template you want to modify.
  2. Click Edit next to the template name.
  3. The popup will open with the template data already populated.
  4. Make the necessary changes and click Save.

Running a Template Immediately (Run Now)

  1. If you want to run a template immediately without waiting for the scheduled time, select the template and click Run Now.

Viewing API Results

  1. Navigate to the View Results page.
  2. Select the template name from the dropdown to view the results of the address cleaning for that template.
  3. Select the Status filter:
    • All Status: Displays all results.
    • Valid: Displays only valid addresses.
    • Invalid: Displays only invalid addresses.
  4. Click Search to view the results.

Result Details

  • The result data will show:
    • Status of the address (valid or invalid)
    • Last updated timestamp
    • Response details if the address is invalid.

Error Logs

This page will display any error encountered during the data cleaning process so that a user may establish the issue and resolve it. If the user is unable to resolve the issue themselves, please quote this error when contacting our Support team.

Create Schedule

  1. Navigate to Setup 
  2. Click on Apex Class 
  3. Click on Schedule Apex.
    1. Select Apex Class cs_update_batch_job
    2. Set the desired frequency for the job to run like the below:
mailLink mailLink

We are here to help

We serve thousands of organisations and a network of hundreds of partners across multiple industry sectors, enabling them to have full confidence in their contact data.